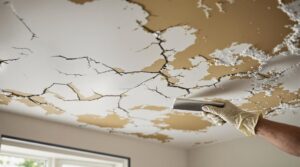
Repairing ceiling plaster cracks requires systematic treatment, beginning with proper surface preparation and crack assessment. A utility knife creates V-shaped grooves along crack lines, followed by thorough cleaning and sanding with 240-grit sandpaper. Professional-grade joint compounds, applied in multiple thin layers with mesh tape reinforcement for wider cracks, guarantee peak adhesion. Proper feathering techniques and careful surface refinement establish the foundation for expert-level ceiling restoration techniques.
Key Takeaways
- Clean the crack area thoroughly and remove loose plaster with a utility knife, creating a V-shaped groove for better compound adhesion.
- Apply mesh tape over wide cracks, then press joint compound firmly into the void using a putty knife.
- Layer multiple thin coats of professional-grade joint compound, feathering each layer outward to blend with surrounding areas.
- Sand between layers with 240-grit sandpaper until the repair area is smooth and level with the existing ceiling.
- Allow repairs to dry completely before painting, and consider using textured paint to help conceal minor surface variations.
Understanding Common Causes of Ceiling Plaster Cracks
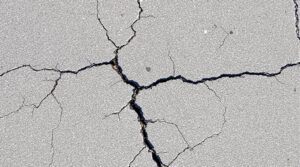
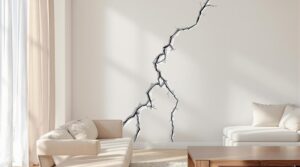
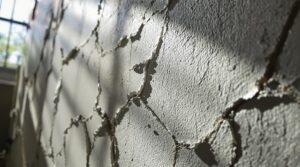
Identifying the root causes of ceiling plaster deterioration is essential for implementing effective repairs. Foundation shifts in aging structures generate stress patterns that manifest as linear or spider-web cracks across plaster surfaces.
These structural movements, often resulting from building settlement or soil conditions, create tension that exceeds the plaster's tensile strength.
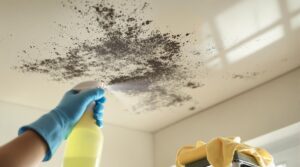
Moisture accumulation, particularly prevalent in high-humidity environments like bathrooms, compromises plaster integrity through sustained exposure. This can lead to both surface deterioration and deeper structural issues within the substrate.
Additionally, seasonal changes induce thermal expansion and contraction cycles in building materials, creating differential movement that results in crack formation.
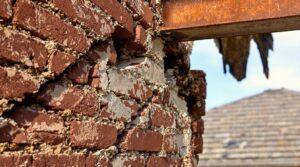
Installation deficiencies, such as inadequate lath attachment or improper mixing ratios, may accelerate crack development during the initial post-construction period.
Understanding these causative factors enables property owners to address both immediate repair needs and implement preventive measures against future deterioration.
Essential Tools and Materials for Plaster Repair

A thorough plaster repair toolkit requires specific implements and materials designed for ceiling restoration work.
Essential hand tools include a putty knife for compound application, a utility knife for precise crack preparation, and a sanding block fitted with 240-grit sandpaper for final surface finishing.
For structural reinforcement, mesh tape provides vital support across wider cracks, while plaster washers secure loose sections to the underlying lath. A drill becomes necessary when installing these washers or creating pilot holes for additional structural support through significant cracks.
Material selection is imperative, with Durabond or Easy Sand serving as primary joint compound options due to their superior bonding characteristics and depth-filling capabilities.
This extensive collection of tools and materials guarantees proper execution of ceiling repairs, from initial crack preparation through final finishing stages.
Each component serves a specific function in the restoration process, contributing to the overall durability and professional quality of the completed repair.
Preparing the Cracked Surface for Treatment

With the proper tools assembled, the initial phase of plaster repair focuses on surface preparation to confirm ideal adhesion and longevity of the repair work. The process begins with a thorough assessment of damaged areas and removal of any loose or deteriorating plaster surrounding the cracks.
Using a utility knife, contractors create V-shaped grooves along the crack lines, establishing optimal channels for filler material adhesion. This technique increases the surface area for bonding and confirms superior repair durability.
The preparation continues with surface refinement using 240-grit sandpaper to sand smooth any rough edges, followed by an extensive cleaning with a damp cloth to eliminate dust particles.
Before proceeding with repairs, technicians must evaluate moisture presence, as dampness can compromise adhesion. Where structural integrity is questionable, reinforcement measures include installing screws into framing members and applying construction adhesive to stabilize loose sections of plaster ceiling material.
Step-by-Step Crack Filling Techniques

The successful repair of ceiling plaster cracks demands systematic application of proven filling techniques. Initial assessment determines crack depth and width, followed by V-notching wider fissures with a putty knife to enhance filler adhesion.
After thorough debris removal, professional-grade compounds like Durabond or Easy Sand are applied. For ideal results, the filler must be firmly pressed into the void using deliberate putty knife strokes, ensuring complete penetration.
Wider cracks require reinforcement with mesh tape prior to compound application, establishing essential structural support. Once the base layer cures, technicians apply a carefully feathered skim coat to achieve surface uniformity with the existing ceiling texture.
This process requires precise trowel control to create seamless shifts between repaired and untreated areas. Following adequate curing time, the repair undergoes fine sanding, with meticulous attention to dust removal before final finishing procedures commence.
Achieving a Smooth and Seamless Finish

Professional plaster repair requires methodical sanding techniques, beginning with 240-grit sandpaper to eliminate surface irregularities and achieve ideal smoothness between filled and existing surfaces.
Multiple thin layers of compound, feathered outward from the repair site, create superior coverage while preventing visible seams or ridges in the finished surface.
Careful attention to matching surrounding textures through appropriate application methods and specialized painting techniques guarantees the repaired area seamlessly integrates with the original ceiling surface.
Sanding Techniques Matter Most
Mastering proper sanding techniques represents the critical final phase in achieving a flawless ceiling plaster repair. Utilizing 240 grit sandpaper guarantees optimal surface preparation while preserving the surrounding finish integrity.
A longer sanding block provides consistent pressure distribution, essential for achieving uniform results across the repair area.
Professional finishers emphasize the importance of feathering techniques around repair edges, creating imperceptible changes between new and existing surfaces.
After initial sanding, technicians must thoroughly clean the area with a damp cloth to remove particulate matter, assuring maximum paint adhesion. Regular inspection under varied lighting conditions reveals any remaining imperfections requiring attention before primer application.
This methodical approach to surface preparation greatly impacts the final aesthetic quality of the repair, making proper sanding technique fundamental to project success.
Layering For Perfect Coverage
Creating a flawless ceiling repair requires precise layering techniques that begin with flexible caulk application. The elasticity of the caulk provides essential movement control, preventing future crack formation while establishing a stable foundation for subsequent layers.
Key steps for achieving ideal coverage:
- Apply flexible caulk directly into the crack, ensuring complete penetration.
- Layer spackling compound over cured caulk, extending slightly beyond repair boundaries.
- Utilize wet putty knife techniques to feather edges for seamless integration.
After the spackling compound has fully cured, thorough sanding creates the smooth surface necessary for the final phase.
Matching the existing painting texture becomes vital at this stage, as proper replication of surface patterns effectively conceals the repair work, resulting in a professional-grade finish that blends seamlessly with surrounding areas.
Blend Textures With Care
A flawless texture blend represents the defining factor between amateur repairs and professional-grade ceiling restoration. The process requires meticulous attention to feathering techniques along repair edges, utilizing specialized tools like knockdown knives and sponges to achieve precise texture matching.
Success in plaster repair depends on maintaining consistent compound ratios and applying material systematically. Technicians must guarantee proper drying intervals between successive layers while monitoring the repair compound's viscosity to match existing surfaces.
The strategic implementation of feathering techniques creates imperceptible shifts between repaired and original areas. For top results, professionals often recommend applying textured paint across the entire ceiling surface post-repair. This final step harmonizes varying textures and effectively conceals minor inconsistencies, resulting in a cohesive, professional finish.
Painting and Texture Matching Tips

When undertaking plaster ceiling repairs, achieving a seamless finish requires careful attention to both painting techniques and texture matching.
Professional results depend on proper surface preparation and the selection of compatible materials, particularly when choosing primers that work with specific fillers. Water-based primers, for instance, are ideal when using multipurpose fillers like British Paints 4 In 1.
For best results, follow these essential steps:
- Practice texture matching techniques on a sample board, experimenting with stippling or knockdown methods to replicate existing patterns.
- Allow repaired areas to cure completely before applying paint, guaranteeing thorough sanding for smooth integration.
- Implement specialized painting techniques such as sponging or rag rolling to disguise repair imperfections.
Regular visual inspection under varied lighting conditions during the painting process is vital for detecting inconsistencies.
This systematic approach guarantees that repairs blend seamlessly with the surrounding ceiling surface, creating a cohesive and professional appearance.
Preventing Future Ceiling Cracks

Effective prevention of recurring ceiling cracks requires implementing structural movement control methods through extensive foundation monitoring and strategic installation of expansion joints.
Regular inspection protocols should include moisture-level assessment, particularly in high-humidity zones, coupled with thorough examination of attic insulation integrity to maintain consistent thermal conditions.
Professional-grade ventilation systems, combined with moisture barriers and vapor-resistant materials, create an ideal environment that minimizes plaster stress and extends the longevity of ceiling repairs.
Structural Movement Control Methods
Maintaining structural integrity through movement control methods serves as a critical foundation for preventing future ceiling plaster cracks.
Professional monitoring systems and preventive measures help identify early warning signs of structural movement while implementing appropriate solutions.
Key structural control methods include:
- Installing vapor-resistant moisture barriers in attics and high-humidity areas to regulate environmental conditions affecting plaster stability.
- Implementing proper drainage systems with correctly positioned gutters and downspouts to prevent foundation settling.
- Utilizing flexible caulking compounds at critical junction points to accommodate natural building movement.
Additional reinforcement through strategic framing and ceiling strapping provides supplemental support in areas prone to stress-related deterioration.
Regular assessment of existing crack patterns enables technicians to develop targeted intervention strategies before minor issues escalate into significant structural concerns.
Regular Inspection Best Practices
Strategic inspection protocols form the cornerstone of preventive maintenance for ceiling plaster preservation.
Biannual inspections enable early detection of ceiling cracks, delamination, and moisture damage, particularly in vulnerable areas near windows, doors, and corners where structural movement commonly manifests.
During assessments, practitioners should employ utility knives to excise loose plaster and evaluate substrate integrity through soundness testing.
Crucial attention must focus on bathrooms and kitchens, where elevated moisture levels potentially compromise plaster stability.
Environmental control plays an essential role, with ideal humidity levels maintained between 30-50% to prevent desiccation-induced cracking.
Regular inspections must document all findings, tracking the progression of any identified issues and establishing patterns that may indicate underlying structural concerns requiring immediate intervention.
Moisture Prevention Techniques
Moisture control stands as a fundamental defense against plaster ceiling deterioration. Implementing strategic moisture prevention techniques safeguards against structural damage and minimizes the need for frequent repairs. Proper ventilation systems in high-moisture areas like bathrooms and kitchens are essential to prevent water vapor accumulation.
Key moisture prevention strategies include:
- Installing dehumidifiers to maintain ideal humidity levels and protect plaster integrity.
- Applying moisture-resistant sealants and specialized coatings to create protective barriers.
- Maintaining effective gutter systems to prevent water infiltration from exterior sources.
Regular monitoring of plumbing systems and roof conditions helps identify potential moisture threats before they compromise ceiling plaster.
When combined with proper ventilation maintenance, these preventive measures greatly reduce the risk of moisture-related deterioration and extend the longevity of plaster surfaces.
Frequently Asked Questions
How Do You Fix Cracks in Plaster Ceilings?
Professional crack assessment identifies the extent of plaster ceiling damage, determining suitable repair techniques. This assessment often involves a thorough inspection to pinpoint the underlying issues contributing to the damage. In many cases, cracks in ceiling causing water leaks can exacerbate the deterioration, leading to further complications if left unaddressed. Once the severity of the cracks is established, professionals can recommend appropriate repair techniques, ensuring a durable and long-lasting solution that restores both safety and aesthetics. Additionally, understanding the various types of structural ceiling cracks is crucial for effective remediation. By classifying the cracks based on their origin—whether they result from settlement, moisture, or foundation issues—professionals can tailor their repair strategies to address not only the visible damage but also the root causes. This comprehensive approach helps prevent future incidents, ensuring that homeowners have peace of mind and a well-maintained living space. Moreover, it is essential for homeowners to be vigilant about identifying dangerous wall and ceiling cracks, as these can signal serious structural issues that may compromise the integrity of the entire property. Regular inspections and prompt action in addressing these cracks can mitigate risks and avoid costly repairs down the line. Ultimately, investing in professional assessment and remediation not only safeguards the home but also enhances its overall value and safety. Moreover, ongoing maintenance and monitoring of the ceiling can play a significant role in prolonging the integrity of the home. Homeowners are encouraged to stay vigilant for any signs of new cracks forming and to seek immediate professional evaluation when these occur. For those looking to deepen their understanding of the issue, ‘structural ceiling cracks explained‘ can provide valuable insights into not just the signs and symptoms, but also preventative measures that can be taken to mitigate risks and maintain the home’s structural health.
The process involves V-grooving affected areas, applying high-grade compounds like Durabond, and reinforcing with mesh tape where necessary.
Preventative measures include moisture control and structural monitoring.
Cost estimation varies based on crack severity, material requirements, and labor complexity, typically ranging from basic patching to thorough restoration work.
What Is the Best Filler to Use on Ceiling Cracks?
Setting compounds like Durabond represent the ideal filler choice for ceiling cracks, offering superior adhesion and durability.
For surface-level imperfections, multipurpose fillers provide quick drying times and excellent workability.
Products like Selleys No More Gaps excel in areas subject to movement, while pre-mixed options such as Poly 1 suit smaller repairs.
Professional application techniques involve proper surface preparation and may incorporate mesh tape for enhanced structural integrity.
What Is the Best Compound for Plaster Ceiling Repair?
As solid as a foundation, setting compounds like Durabond stand as the premier choice for plaster ceiling repair techniques. This professional-grade material offers superior adhesion and structural integrity compared to conventional joint compounds.
For ideal ceiling damage prevention, Easy Sand provides an alternative with its reduced shrinkage properties.
A thorough restoration tools checklist should include mesh tape for reinforcement before painting plaster surfaces, ensuring maximum durability and longevity.
Can Hairline Cracks in Plaster Be Repaired?
Hairline cracks in plaster are repairable through established remediation techniques. The process requires V-grooving the crack, followed by application of latex caulk or fine spackling compound.
Surface preparation and proper filling methodology greatly impact repair longevity. Prevention methods include monitoring structural movement and moisture levels.
Regular ceiling maintenance, including inspection for crack causes and timely intervention, helps minimize future deterioration.
Professional-grade materials and precise application guarantee excellent results.
Final Thoughts
Proper ceiling plaster repair requires meticulous attention to substrate integrity and material compatibility. Like a well-orchestrated symphony, each repair phase—from strategic surface preparation to precise compound application—contributes to the final restoration. Following industry-standard methodologies while employing appropriate bonding agents and finishing techniques guarantees structural stability and aesthetic continuity, ultimately extending the serviceable life of the plaster system.
For homeowners experiencing ceiling plaster damage that may be covered under their homeowners insurance policy, insurance industry experts and legal professionals strongly recommend consulting a qualified state-licensed public adjuster to handle their insurance claims. Public adjusters serve as dedicated advocates for policyholders, working exclusively to protect their interests rather than those of insurance companies. These state-licensed professionals help navigate complex insurance policies, identify hidden damages that policyholders might not know are covered, thoroughly document losses, and negotiate with insurance companies to secure fair settlements while protecting policyholder rights. By engaging a public adjuster, homeowners can potentially maximize their claim payouts, expedite the claims process, and reduce the stress of dealing with insurance companies, allowing them to focus on property restoration. Policyholders seeking expert assistance with property damage claims can request a no-obligation free consultation with a Public Claims Adjusters Network (PCAN) member public adjuster through their contact page.