Removing mold from inside walls requires proper safety equipment, including NIOSH respirators, goggles, and TYVEK suits. The affected area must be sealed with polyethylene sheeting and ventilated with negative air pressure. Treatment involves cutting drywall two feet beyond visible contamination and applying appropriate cleaning solutions based on surface type. Professional moisture meters and inspection tools guarantee thorough remediation. A complete approach addresses both immediate removal and long-term prevention strategies.
Key Takeaways
- Seal off the affected area with polyethylene sheeting and establish negative air pressure to prevent spore spread during removal.
- Cut and remove affected drywall sections extending 2 feet beyond visible mold contamination to ensure complete elimination.
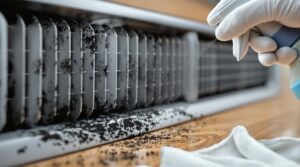
- Use appropriate safety gear including NIOSH respirator, goggles, and TYVEK suit before beginning any mold removal work.
- Apply a 1:3 bleach-water solution for general wall surfaces or undiluted vinegar which eliminates 80% of mold species.
- Install mold-resistant drywall and primers during restoration, while maintaining indoor humidity between 30-50% to prevent future growth.
Signs of Mold Inside Your Walls
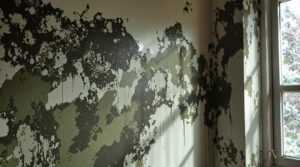
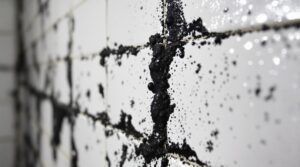
While mold inside walls can remain hidden from view, there are several distinct indicators that signal its presence. Common visible indications include discoloration on walls, typically appearing as brown or grey stains, along with paint that shows bubbling, cracking, or wrinkling. These symptoms often accompany water damage, which creates ideal conditions for mold growth. A musty, distinctive odor emerging from your walls often indicates mold growth hidden behind them. Hidden mold can develop within 24-48 hours after water damage occurs. Sensory clues provide additional evidence of hidden mold.
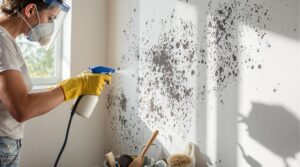
Safety Precautions Before Starting

Safety during mold remediation requires strict protocols and proper protective measures to minimize health risks and prevent cross-contamination. Before beginning any removal process, individuals must establish proper containment using polyethylene sheeting and secure it with duct tape to isolate the affected area. Essential protective gear includes NIOSH-approved breathing equipment, safety goggles, and disposable TYVEK suits. The presence of strong musty odors often indicates significant mold growth that requires immediate attention. Initial mold colonies can develop within 48 hours after water exposure.
| Equipment Type | Purpose | Critical Features |
|---|---|---|
| Respirator | Prevent Spore Inhalation | N-95 or Higher Rating |
| Body Protection | Prevent Skin Contact | Full Coverage, Disposable |
| Eye Protection | Shield from Airborne Spores | Sealed Goggles |
| Hand Protection | Enable Safe Handling | Chemical-Resistant Gloves |
For areas exceeding 10 square feet, professional remediation services are recommended. The workspace must maintain negative air pressure through proper ventilation, and HVAC systems should remain off to prevent spore dispersal. A decontamination chamber should be established for entering and exiting the containment area.
Essential Tools and Materials

Tackling mold removal inside walls requires a thorough set of specialized tools, cleaning agents, and safety equipment.
The process demands proper protective equipment, including non-porous gloves, goggles, and N95 respirator masks to prevent exposure to harmful spores and cleaning chemicals. A bleach-water solution mixed in a 1:3 ratio provides an effective cleaning agent for initial mold treatment.
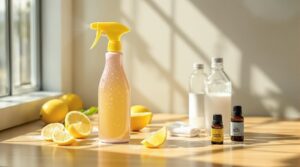
Essential cleaning agents range from commercial mold removers to natural solutions like vinegar and hydrogen peroxide, each suited for specific surface types. While natural remedies work effectively on 82% of mold species, multiple applications may be needed for complete removal.
Key components for effective mold remediation include:
- Professional-grade moisture meters to identify water intrusion points
- Dehumidifiers and fans for controlling ambient moisture levels
- Air scrubbers to filter airborne spores during removal
- Mold-resistant primers and paints for preventive treatment
- Plastic sheeting and painter’s tape for containment
Environmental monitoring tools, such as hygrometers, help maintain ideal conditions post-remediation. Additional materials like mold-resistant drywall may be necessary for extensive repairs, ensuring long-term protection against future mold growth.
Step-by-Step Removal Process

The first critical phase in removing mold from inside walls involves proper preparation of the work area using protective barriers and ventilation controls.
Following safety protocols, workers must seal off the affected space with plastic sheeting and establish negative air pressure using HEPA-filtered fans.
Once containment measures are in place, the removal process begins with careful cutting and extraction of affected drywall sections, taking care to minimize the spread of spores during demolition.
Workers must wear N-95 respirator masks and protective suits during the entire removal process to prevent exposure to harmful spores.
Prepare Work Area First
Before beginning the mold removal process, proper preparation of the work area is essential to prevent cross-contamination and protect both the workspace and inhabitants.
The workspace layout requires strategic planning to establish containment and guarantee effective ventilation setup. Creating a controlled environment minimizes the spread of mold spores throughout the building.
- Seal the affected area using plastic sheets and tape to create containment barriers
- Establish proper ventilation by opening windows and using fans to direct airflow outward
- Cover furniture and flooring with protective plastic sheeting
- Don appropriate personal protective equipment including N95 respirator, gloves, and goggles
- Gather necessary cleaning supplies and tools within the contained workspace
Following these preparatory steps creates a safe environment for mold remediation while protecting unaffected areas from contamination.
Professional remediation experts maintain relative humidity levels below 65% to prevent mold regrowth during and after the removal process.
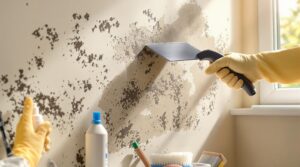
Remove Affected Wall Sections
With proper workspace preparation complete, removing affected wall sections requires a systematic approach to guarantee thorough mold elimination. The first removal techniques involve identifying the moisture source and implementing protective measures by laying plastic drop cloths and sealing the work area to prevent spore dispersal. A HEPA vacuum helps capture airborne particles before proceeding.
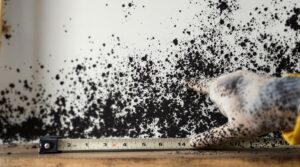
Using a stud finder, locate support beams and mark an area extending two feet beyond visible mold growth. Cut the affected drywall carefully with a utility knife, avoiding power tools that could disperse spores. Place the removed section mold-side up on protected surfaces, then securely wrap and dispose of contaminated materials. This methodical process guarantees safe removal while minimizing the risk of cross-contamination throughout the workspace. Maintaining indoor humidity levels between 30-50% after removal helps prevent future mold growth.
Cleaning and Sanitizing Techniques

The removal of mold from inside walls requires systematic cleaning and sanitizing through proven chemical and natural treatment methods.
Effective options include non-phosphate detergents for initial cleaning, followed by either a diluted bleach solution for non-porous surfaces or hydrogen peroxide for porous materials.
The sanitization process must incorporate proper drying techniques using dehumidifiers and fans to prevent mold recurrence, while maintaining strict safety protocols with appropriate protective equipment.
Tea tree oil solutions provide an effective natural alternative that eliminates most common indoor mold species.
Safe Chemical Treatment Methods
Successfully removing mold from interior walls requires proper chemical treatment methods and careful sanitizing techniques. In addition to utilizing effective chemical solutions, it’s crucial to maintain a well-ventilated environment to prevent future mold growth. Homeowners often search for information on how to remove mold from walls, but they must also consider the underlying moisture issues that contribute to mold formation. Regular inspections and maintenance can help ensure that your living space remains mold-free and healthy.
When applying chemical treatments, workers must wear appropriate protective equipment including N95 respirators, gloves, and goggles.
The most effective chemical dilutions involve mixing bleach with water in specific ratios for different surface types.
Key chemical treatment protocols include:
- Mix one part bleach to three parts water for general wall surfaces
- Create a 1:10 bleach-water ratio for non-porous materials
- Apply solution thoroughly to affected areas and scrub vigorously
- Allow disinfectant to remain on surfaces for recommended contact time
- Use commercial mold removers according to manufacturer specifications
The chemical treatment process requires thorough coverage of all affected areas, including corners and crevices, followed by proper drying using fans and dehumidifiers to prevent future mold growth.
Indoor humidity levels must stay below 65% to prevent new mold formation after treatment.
Natural Cleaning Solution Options
Several natural cleaning solutions provide effective alternatives to harsh chemicals when removing mold from interior walls.
Among these natural alternatives, vinegar stands out as particularly effective, capable of eliminating over 80% of mold species when applied undiluted.
Regular monitoring of moisture levels below 60% helps prevent future mold growth while using natural cleaning methods.
Deep Wall Disinfection Steps
While natural cleaning solutions offer effective mold removal options, proper deep wall disinfection requires a systematic approach to safeguard complete elimination of mold and prevention of its return.
The disinfection procedures must follow a precise sequence of penetrating treatments that address both surface and subsurface contamination.
- Apply water to dampen affected areas, preventing airborne spore dispersal
- Utilize HEPA-filtered equipment to remove loose spores before treatment
- Implement appropriate cleaning solutions using non-abrasive materials
- Execute thorough disinfectant application after primary cleaning
- Deploy dehumidification equipment to ensure complete drying
The process requires proper containment of the workspace using plastic sheeting and maintaining ideal ventilation control throughout the procedure.
Regular monitoring and maintenance following deep disinfection help prevent future mold occurrence through early detection and moisture management.
Professional deep wall disinfection typically costs $10 to $25 per square foot depending on the severity and type of mold present.
Rebuilding and Restoration Tips

Once the mold remediation process is complete, proper rebuilding and restoration procedures are essential to prevent future infestations and guarantee structural integrity. Before initiating reconstruction, obtaining necessary permits and evaluating the full scope of damage confirms compliance with local building codes. Professional contractors may be required for extensive structural repairs.
During restoration, focus on implementing material alternatives that resist moisture and mold growth. Replace damaged drywall with mold-resistant variants, extending removal one foot beyond visible contamination. Apply mold-resistant primers to exposed framing and select moisture-resistant flooring options.
Ventilation upgrades play a vital role in preventing future issues, particularly in susceptible areas like attics and basements. Install proper insulation and seal all gaps to prevent moisture intrusion.
For structural reinforcement, incorporate additional support where needed and confirm all rebuilt sections maintain proper air circulation. Complete the restoration with mold-inhibiting paint and ongoing moisture monitoring protocols.
Prevention and Maintenance Strategies

The most effective approach to preventing mold growth within walls involves implementing a complete moisture control strategy. This includes systematic humidity management through dehumidifiers and proper ventilation improvements throughout the structure.
Regular maintenance inspections should focus on potential moisture sources, particularly in areas prone to water intrusion such as basements, bathrooms, and areas around plumbing fixtures.
Key preventative measures include:
- Installing proper drainage systems around the foundation
- Maintaining ideal indoor humidity levels between 30-50%
- Implementing adequate ventilation in high-moisture areas
- Conducting regular inspections of plumbing and roof integrity
- Using mold-resistant building materials during renovations
Proper maintenance requires prompt attention to water-related issues, typically within 48 hours of occurrence.
Professional assessment of ventilation systems and moisture barriers can identify potential weaknesses before they lead to mold establishment.
Additionally, strategic placement of dehumidifiers and moisture meters helps monitor conditions that could support mold growth.
The Benefits Of Consulting A Public Adjuster

Consulting a public adjuster provides homeowners with specialized expertise in maneuvering complex insurance claims related to mold damage within walls.
These licensed professionals conduct thorough, objective assessments of mold damage while documenting all affected areas, ensuring complete coverage of repair costs and associated damages.
Public adjusters streamline the claims process through skilled negotiations with insurance companies, typically resulting in higher settlement amounts compared to self-filed claims.
Expertise In Insurance Claims
Insurance claims involving mold damage require specialized knowledge and expertise to navigate effectively.
Public adjusters possess extensive understanding of insurance coverage policies and claims documentation procedures, enabling them to maximize settlement outcomes for property owners. Their proficiency in interpreting policy terms and regulations guarantees compliance while advocating for policyholder interests.
Key aspects of public adjuster expertise include:
- Thorough interpretation of insurance policy fine print and coverage limitations
- Strategic documentation of mold damage and associated losses
- Professional negotiation with insurance carriers to optimize settlements
- Management of complex paperwork and proof of loss requirements
- Implementation of industry-standard procedures for claims submission and follow-up
This specialized knowledge allows public adjusters to streamline the claims process while guarantees all available benefits are properly accessed and utilized.
Objective Damage Assessment
Professional damage assessment conducted by public adjusters provides property owners with thorough, unbiased evaluations of mold-related issues. Through standardized assessment protocols, adjusters meticulously document all damage indicators, from visible growth patterns to hidden structural concerns.
The assessment process encompasses exhaustive property inspections, detailed photographic documentation, and analysis of contributing factors. Public adjusters utilize specialized equipment to detect concealed mold growth and evaluate moisture levels within wall cavities. Their expertise in insurance policies enables them to align findings with coverage specifications.
This systematic approach yields precise damage reports that facilitate efficient claim processing and maximize compensation potential. The objective nature of these assessments reduces disputes with insurers while ensuring compliance with industry standards for mold remediation. Additionally, identifying root causes helps prevent future occurrences through targeted remediation strategies.
Streamlined Claim Process
A streamlined claims process represents one of the primary advantages of engaging a public adjuster for mold-related property damage.
Public adjusters utilize process automation and claims tracking systems to guarantee efficient handling of insurance claims while maintaining regulatory compliance.
Their expertise in documentation and standardized procedures minimizes errors and expedites settlements.
Key benefits of a public adjuster’s streamlined approach include:
- Implementation of automated workflows to accelerate claims processing
- Systematic documentation of mold damage using standardized protocols
- Expert verification of policy compliance throughout the claims cycle
- Efficient coordination between insurers and restoration contractors
- Real-time monitoring of claim status and settlement progress
This systematic approach reduces processing time, ensures accurate documentation, and maximizes the likelihood of a favorable settlement while maintaining complete compliance with insurance requirements.
Higher Claim Payouts & Settlements
When homeowners engage public adjusters for mold-related claims, they typically secure substantially higher settlements compared to handling claims independently. Public adjusters leverage their expertise in insurance maximization to identify all compensable damages, including those often overlooked by property owners during initial assessments.
These licensed professionals utilize their thorough understanding of insurance policies and procedures to achieve settlement optimization through strategic negotiation. Their expertise in countering common insurance company tactics helps guarantee full compensation under the policy terms.
Working on a contingency basis, usually charging up to 10% of the settlement, public adjusters’ fees are generally offset by the increased claim amounts they secure. Their professional documentation methods and thorough damage assessments contribute markedly to achieving maximum allowable compensation for mold-related damages.
About The Public Claims Adjusters Network (PCAN)

The Public Claims Adjusters Network (PCAN), led by the Network of Independent Claims Adjusters (NICA), represents a thorough claims management organization with over 40 years of industry expertise. Their Network Benefits include complete claims handling solutions, from initial loss notification to final settlement, while their Coverage Details encompass both daily and catastrophic event adjustments.
PCAN delivers professional services through:
- Complete claims management solutions tailored to specific operational challenges
- State-certified adjusters with extensive experience in various damage types
- Contingency-based payment structure eliminating out-of-pocket expenses
- Call center support providing immediate assistance for first notice of loss
- Professional representation focused on maximizing claim settlements
Their proven expertise extends across multiple insurance claim types, including water, fire, and storm damage.
Studies demonstrate that utilizing public adjusters substantially increases claim payouts, while maintaining high service quality throughout the claims lifecycle.
PCAN’s adjusters work exclusively for property owners, ensuring ideal outcomes through professional advocacy and expert claim navigation.
Frequently Asked Questions
How Long Should I Wait After Cleaning Before Rebuilding the Wall?
After thorough cleaning, walls require a minimum 3-5 day drying duration, with continuous ventilation requirements. Moisture levels must register below 12% before reconstruction can safely commence.
Can I Remove Mold From Walls During Winter Months?
Mold removal can proceed during winter months with proper indoor ventilation and controlled ambient temperature. Maintaining warmth above 60°F while managing humidity levels guarantees effective treatment and prevents moisture condensation.
Will My Homeowner’s Insurance Cover Professional Mold Removal Services?
Insurance coverage for mold removal depends on the cause. Standard policies include coverage limits when damage results from covered perils, but maintain strict insurance exclusions for maintenance-related or long-term moisture issues.
How Often Should Internal Wall Cavities Be Inspected for Mold?
Internal wall cavity inspection frequency varies by climate and building conditions. Annual inspections are recommended, with increased frequency in humid regions or where cavity ventilation is compromised by construction defects.
Does Removing Mold From Walls Affect the Home’s Structural Integrity?
Like ancient Roman walls crumbling, extensive mold removal can cause structural shifts if not properly executed. Professional remediation minimizes foundation impact while addressing decay that naturally compromises load-bearing capacity.
References
- https://www.truevalue.com/diy-projects/maintenance-and-repair/cleaning-and-organizing/remove-mold-from-walls/
- https://www.servicemasterrestore.com/servicemaster-disaster-associates-stoneham/why-us/blog/2022/june/tips-to-remove-mold-from-the-walls/
- https://yourmoldsolutions.com/blog/7-safety-tips-for-mold-cleanup-and-remediation-tasks/
- https://www.abestorm.com/blogs/news/how-to-remove-mold-from-inside-walls
- https://advantaclean.com/ft-lauderdale-fl/about-us/blog/can-you-get-rid-of-mold-without-tearing-down-walls/
- https://www.cleanerguys.com/is-there-mold-in-my-walls/
- https://trusscore.com/blog/how-to-remove-mold-from-inside-walls-and-ceilings.html
- https://www.twinplumbing.com/5-signs-you-have-mold-inside-walls-and-how-to-deal-with-it/
- https://greenorchardgroup.com/7-warning-signs-of-mold-in-your-home/
- https://www.epa.gov/mold/mold-course-chapter-6