Removing black mold on drywall requires a thorough approach to guarantee safe eradication. Identify black mold by its dark stains or patches in high-moisture areas, and prepare for removal by wearing protective gear and sealing off the area. Remove affected drywall sections, taking care to contain mold spores, and clean the area behind the drywall with a mold-killing solution. Proper disposal and remediation are essential to prevent recurrence. A more detailed understanding of the removal process can provide further guidance on effective mold eradication.
Key Takeaways
- Identify black mold on drywall by looking for dark stains or patches in high-moisture areas and a musty odor.
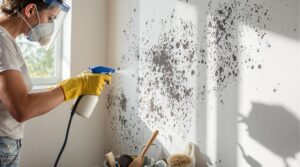
- Wear personal protective equipment, seal off the area, and ensure proper ventilation before removing black mold from drywall.
- Cut out affected drywall sections at least 2 feet beyond visible mold, wrap in plastic, and dispose of according to local hazardous materials regulations.
- Clean and dry the area behind the drywall with a mold-killing solution and HEPA vacuum to prevent further mold growth.
- Consider seeking professional help if the affected area is larger than 10 square feet or if you have respiratory issues or allergies.
Identifying Black Mold on Drywall
In many cases, identifying black mold on drywall can be a straightforward process, as it typically manifests as dark stains or patches in areas prone to high moisture, such as bathrooms and basements.
The presence of moisture is a key factor in the growth of black mold, which thrives in environments with elevated humidity levels. To identify black mold on drywall, one should look for visible signs of discoloration, musty odors, and damp spots, which often indicate moisture issues behind the wall.
Water stains, peeling paint, and fuzzy or slimy spots are common indicators of mold growth. It is essential to inspect both sides of the drywall, as mold can penetrate the gypsum and paper composition.
A thorough examination of the affected area is vital to detect and address the issue promptly, as black mold can produce mycotoxins that pose health risks. Poor air circulation in affected areas can lead to humidity levels above 65%, creating ideal conditions for mold growth.
Preparing for Black Mold Removal

To safely initiate the black mold removal process, it is essential to take specific precautions to minimize exposure to toxic mold spores.
First, one must don personal protective equipment, including an N95 mask, long rubber gloves, and safety goggles.
Next, seal off the affected area from the rest of the home by closing doors and using plastic sheeting to prevent the spread of mold during removal.
Cover the floors and surrounding areas with plastic drop cloths to protect them from potential mold contamination.
Guarantee proper ventilation by opening windows and doors, and consider using a HEPA air filtration system.
Before beginning the removal process, identify and fix the source of moisture that caused the mold growth to prevent recurrence. This may involve repairing a leak or improving ventilation.
The indoor humidity level range should be maintained between 30-50% during and after remediation to prevent future mold growth.
Removing Affected Drywall Sections

Removing Affected Drywall Sections
====================================
Once the affected area has been properly prepared, removing the black mold-infested drywall sections can begin. This step requires attention to detail to minimize agitation of mold spores.
Removing Affected Drywall Checklist
| Item | Procedure |
|---|---|
| 1. Mark the area | Extend at least 2 feet beyond visible mold using a stud finder |
| 2. Cut out drywall | Use a utility knife to carefully cut the marked area |
| 3. Handle moldy drywall | Wrap in plastic drop cloth for safe handling |
| 4. Dispose of moldy drywall | Follow local regulations for hazardous materials disposal |
| 5. Prepare for replacement | Use a mold-killing solution to clean and dry the area |
When removing the drywall, it is essential to fix the source of moisture first to prevent recurrence of black mold. Removing the affected area without addressing the root cause will only lead to further mold growth.
Wearing an N-95 respirator mask is crucial during removal as it filters 95% of airborne mold spores that can cause respiratory issues.
Cleaning the Area Behind the Drywall

Once the affected drywall sections have been removed, the area behind the drywall must be thoroughly cleaned to prevent further mold growth.
This involves removing debris and dust that may have accumulated within the cavity, as well as cleaning exposed wood studs and other surfaces to eliminate any remaining mold or moisture.
Effective cleaning and drying of the entire cavity is essential to ensuring a mold-free environment for the installation of new drywall.
Using stiff-bristled brush scrubbing techniques followed by a thorough rinse will help eliminate mold spores from exposed surfaces.
Removing Debris and Dust
Behind the affected drywall, a thorough cleaning is crucial to prevent the spread of mold spores and to allow for a safe working environment.
To begin, ventilate the room by opening windows and using a fan to minimize exposure to airborne mold spores.
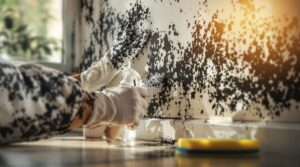
Wear personal protective equipment, including an N95 mask, gloves, and goggles, to safeguard against inhalation of mold spores and contact with contaminants.
Use a HEPA vacuum cleaner to effectively capture fine dust and debris.
After removing debris, clean the surfaces with a mold-killing cleaning solution to inhibit further mold growth.
Verify the area is thoroughly dried after cleaning, using an electric fan or dehumidifier if necessary, to prevent lingering moisture from leading to mold's quick return.
For best results, maintain the area's temperature between 41-104 degrees Fahrenheit to discourage future mold growth.
Cleaning Exposed Wood Studs
Inspecting the area behind the drywall affected by black mold often reveals exposed wood studs that also require thorough cleaning to prevent the spread of mold spores. To clean exposed wood studs, lightly spray them with a mold stain remover and allow it to sit for a few minutes before scrubbing with a sponge to remove surface mold. Quaternary ammonium compounds are effective at killing both surface and embedded mold on wood surfaces.
| Step | Action |
|---|---|
| 1 | Spray mold stain remover on wood studs |
| 2 | Allow it to sit for a few minutes |
| 3 | Scrub with a sponge to remove surface mold |
| 4 | Repeat if necessary to remove deeper mold |
| 5 | Dry the area thoroughly to prevent mold growth |
Repeated applications may be necessary to completely remove black mold. Use a dehumidifier to reduce humidity levels and prevent mold recurrence. Always wear personal protective equipment while cleaning mold.
Drying the Entire Cavity
Eliminating moisture from the cavity behind the drywall is essential to preventing further mold growth. To achieve this, lightly spray the cavity with a mold-killing solution after removing the moldy drywall.
Then, focus on drying the area completely using an electric fan on high, aiming for a moisture content below 15%.
Some key considerations during the drying process include:
- Airing the cavity thoroughly with fans to speed up evaporation
- Monitoring for any signs of lingering moisture that could lead to mold re-establishment
- Inspecting wooden studs and insulation for mold presence and treating as necessary
- Addressing the source of moisture, such as leaks or high humidity, to maintain a dry environment behind the drywall and prevent future mold growth.
Using HEPA air scrubbers during the drying process helps capture airborne mold spores and prevent cross-contamination.
Disposing of Moldy Drywall

Proper disposal procedures are essential when handling moldy drywall to prevent the spread of mold spores to other areas.
Moldy drywall must be carefully wrapped in a plastic drop cloth and placed in a sealed bag or container to contain spores during transport.
Adhering to these procedures guarantees safe disposal and minimizes the risk of contamination and associated health risks.
Proper Disposal Procedures
Removing moldy drywall requires careful handling to prevent the spread of mold spores during disposal. This process demands attention to proper disposal procedures to safeguard environmental safety.
Consider the following protocols when disposing of moldy drywall:
- Wrap the moldy drywall securely in plastic to prevent spore release during transport.
- Label the wrapped material as "moldy" to alert waste management personnel of potential hazards.
- Follow local regulations for disposal, which may dictate special handling procedures.
- Never burn moldy drywall, as this can release toxic spores and particles into the air.
For extensive mold infestations, it may be wise to consult a professional mold removal service for guidance on safe disposal practices.
Adhering to these procedures helps guarantee responsible waste management and prevents further contamination.
Containing Mold Spores
As moldy drywall is removed, containing mold spores becomes a critical step in preventing their spread to other areas of the home.
To achieve this, the affected sections should be wrapped in a plastic drop cloth, effectively sealing in the spores and preventing them from becoming airborne during removal.
Once wrapped, the moldy drywall should be placed in heavy-duty garbage bags, further containing the mold spores and making it safer to dispose of.
Following the removal of moldy drywall, the surrounding area should be thoroughly cleaned with a mold-killing solution, eliminating any remaining spores.
This careful approach guarantees that the mold infestation does not spread to other areas of the home, minimizing the risk of further contamination and making it safer to install new drywall.
Sealed Bag Disposal
Carefully disposing of moldy drywall is essential to prevent the spread of mold spores to other areas of the home.
Sealed bag disposal is a critical step in this process. To dispose of moldy drywall, wrap it securely in a plastic drop cloth and seal it with tape to prevent mold contamination during transport.
Key steps for sealed bag disposal:
- Wrap moldy drywall in a plastic drop cloth to contain mold spores
- Seal the wrapped drywall with tape to prevent mold contamination
- Wear protective gear, such as gloves and a mask, when handling moldy drywall
- Label the bag as "Moldy Material" and dispose of it in accordance with local hazardous waste disposal regulations
Replacing Removed Drywall Sections

Drywall repair is an important step in eliminating black mold. Replacing removed drywall sections requires attention to detail to guarantee a proper fit and seamless appearance.
First, measure and cut a new drywall piece to match the size of the cutout. Then, securely attach the new drywall using screws, spacing them appropriately to guarantee stability and support.
Apply joint compound to the seams and any screw holes, smoothing it out for a finished look. Use mold-resistant drywall or a mold-resistant primer on the new section to prevent future mold growth.
Allow the joint compound to dry completely before sanding down the patched areas. A smooth surface is vital before painting or finishing the area.
Preventing Future Mold Growth

Preventing future mold growth is crucial after removing and replacing mold-infested drywall sections. To achieve this, several measures can be taken.
- Maintain indoor humidity levels between 30% and 50% using dehumidifiers to prevent mold from thriving in high-moisture environments.
- Regularly inspect areas prone to moisture, such as bathrooms, kitchens, and basements, for leaks and water damage, and promptly repair any issues to eliminate mold breeding grounds.
- Utilize mold-resistant products, including paints and drywall, to inhibit mold growth on surfaces that are frequently exposed to moisture.
- Guarantee proper ventilation in high-humidity areas by using exhaust fans and opening windows to improve air circulation and reduce moisture buildup.
Safety Precautions for Mold Removal

When removing black mold from drywall, it is essential to take safety precautions to prevent the spread of mold spores and protect oneself and others from exposure.
This includes using specialized equipment and taking steps to isolate the affected area.
Proper safety measures can help minimize the risks associated with mold removal and guarantee a safe and effective remediation process.
Preventing Mold Spore Spread
Every successful mold removal endeavor begins with thorough safety precautions to prevent the spread of mold spores.
To minimize the risk of spreading mold spores, the following precautions are taken:
- Seal off the affected area from the rest of the home using plastic sheeting to prevent mold spores from becoming airborne and spreading to other areas.
- Guarantee proper ventilation in the workspace by opening windows and doors, and consider using a HEPA air filtration system to capture airborne mold spores.
- Cover floors and surrounding areas with plastic drop cloths to protect them from mold spores and any cleaning solutions used during the removal process.
- Wear PPE, including an N95 mask, long rubber gloves, and safety goggles, to prevent inhalation and skin contact with mold spores.
Protecting Yourself and Others
The containment measures outlined in the preceding section provide a solid foundation for preventing mold spore dispersal; however, these precautions are only effective when combined with rigorous safety protocols that prioritize the well-being of individuals involved in the removal process.
Wearing personal protective equipment (PPE) is essential, including an N95 mask, long rubber gloves, safety goggles, and a full-body protective suit. This gear minimizes exposure to mold spores, which can cause respiratory issues and other health complications.
To further guarantee a safe environment, seal off the affected area, maintain a well-ventilated workspace, and cover floors and surrounding areas with plastic drop cloths.
Mold Removal Equipment Needs
Mold removal equipment plays a critical role in ensuring a safe and effective remediation process. To minimize exposure to mold and mold-killing solutions, personal protective equipment is essential.
A well-prepared workspace is also vital for successful mold removal.
- A full-body protective suit, N95 mask, long rubber gloves, and safety goggles for personal protection
- A HEPA air filtration system to capture airborne mold spores
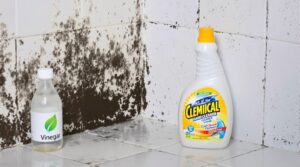
- A mold-killing solution, such as a mixture of 1 part bleach to 3 parts water or commercial mold removers, for effective treatment
- Proper ventilation and plastic sheets to seal off the work area from the rest of the house and reduce airborne mold spores
Common Mistakes to Avoid During Removal

While tackling black mold on drywall, understanding the pitfalls to avoid is just as important as knowing the removal methods. One significant mistake is neglecting to address the moisture source before removal, as this can lead to mold returning.
Another error is attempting to clean mold from unpainted drywall; instead, cut out and replace the affected sections to guarantee complete removal. Using a saw to remove moldy drywall can also agitate mold spores, spreading them into the air and worsening the situation.
Additionally, failing to wear proper personal protective equipment, such as an N95 mask and gloves, can expose individuals to harmful mold spores.
Finally, skipping the step of thoroughly drying the area after cleaning can result in mold re-establishing itself. To guarantee effective mold removal, it is vital to fix leaks or humidity problems, replace affected drywall, and thoroughly dry the area before sealing or replacing drywall.
When to Seek Professional Mold Removal Help

How does one determine whether a mold infestation requires professional intervention? The decision to seek professional help for mold removal depends on several factors.
In the following situations, it is advisable to seek professional assistance:
- Extensive growth: Mold covering an area larger than 10 square feet may indicate deeper issues that require specialized intervention.
- Black mold discovery: Due to potential mycotoxin production and associated health risks, professional help is vital for safe removal.
- Health concerns: Individuals with respiratory issues, allergies, or asthma should consider professional assistance to avoid exacerbating health problems during mold removal.
- Persistent problems: If a persistent odor or visible mold returns after DIY attempts, professionals can address underlying moisture problems effectively.
In these scenarios, professional help guarantees thorough remediation and mitigates health risks associated with mold exposure.
Seeking expert assistance is essential for safe and effective mold removal.
The Benefits Of Consulting A Public Adjuster

Consulting a public adjuster can provide significant benefits to policyholders dealing with black mold damage on drywall.
With expertise in insurance claims, public adjusters can conduct objective damage assessments and streamline the claim process, ultimately leading to higher claim payouts and settlements.
Expertise In Insurance Claims
A crucial aspect of recovering from black mold damage on drywall involves maneuvering the often-complex world of insurance claims. In this situation, the expertise of public adjusters is invaluable in ensuring policyholders receive fair settlements for mold damage.
Key aspects of a public adjuster's role in handling insurance claims for mold damage include:
- Documenting the extent of mold damage through photographs, reports, and expert assessments to support the claim
- Maneuvering the complexities of insurance policies and local regulations
- Managing all aspects of the claims process to save policyholders time and stress
- Utilizing in-depth knowledge of mold inspection and remediation to accurately estimate damages and advocate for fair settlements.
Objective Damage Assessment
When maneuvering through the intricate process of recovering from black mold damage on drywall, an accurate assessment of the damage is essential to guarantee fair compensation from insurance claims.
Consulting a public adjuster provides an objective damage assessment, ensuring that all damage is documented and accounted for in mold damage claims. These licensed professionals conduct thorough inspections, identifying potential hidden mold behind walls, to provide a detailed claim.
By engaging a public adjuster, homeowners can receive higher compensation for damages and save time during the claims process. This allows homeowners to focus on remediation efforts while the public adjuster handles all communication with insurance companies, reducing stress and ensuring a smoother recovery process.
A public adjuster's expertise is invaluable in managing the complexities of mold damage claims.
Streamlined Claim Process
Streamlining the claims process is essential for expedient recovery from mold damage on drywall, allowing homeowners to focus on remediation efforts.
Consulting a public adjuster can facilitate this process by ensuring that all necessary documentation and evidence of mold damage is collected and presented effectively to insurance companies.
Key benefits of hiring a public adjuster include:
- Effective communication and negotiation with insurance companies to settle mold-related claims
- Time and stress savings for homeowners, as public adjusters manage all claim-related correspondence
- Expert knowledge of mold-related health risks and remediation costs to advocate for policyholders' best interests
- Contingency fee basis, aligning public adjusters' interests with policyholders' goal of maximizing claim payout, resulting in fair compensation for mold damage.
Higher Claim Payouts & Settlements
Consulting a public adjuster can have a significant impact on the outcome of a mold damage claim, particularly when it comes to the claim payout. Public adjusters possess the expertise to accurately assess damage and advocate for the policyholder's best interests, resulting in higher claim payouts. By maneuvering through complex coverage issues and guaranteeing maximum benefits, public adjusters can increase settlements by 20% to 50% compared to handling claims independently.
| Benefits of Hiring a Public Adjuster | Impact on Claim Payout | Average Increase in Settlements |
|---|---|---|
| Expert assessment and advocacy | Accurate damage assessment | 20% to 50% increase in settlements |
| Navigation of complex coverage issues | Maximum benefits guaranteed | 5% to 15% fee offset by increased settlements |
| Time and stress savings | Focus on recovery, not claims process | Increased settlements through professional negotiation |
About The Public Claims Adjusters Network (PCAN)

Behind the scenes of nearly every major insurance claim is a professional network that facilitates communication and dispute resolution.
The Public Claims Adjusters Network (PCAN) is a national network of pre-vetted, verified, and state-licensed public adjusters specializing in residential and commercial property damage insurance claims.
PCAN serves as a resource for policyholders to connect with expert public adjusters who are pre-vetted, licensed, and experts in their field.
Some key benefits of working with PCAN member adjusters include:
- Expertise in handling complex insurance claims, including moisture damage and black mold remediation
- Personalized service and attention to detail, ensuring policyholders receive fair compensation
- Licensed professionals with a proven track record of successfully resolving disputes and maximizing claim payouts
- Access to a network of top public adjusters across the nation, providing policyholders with unparalleled support and guidance
Frequently Asked Questions
Can Black Mold Be Cleaned off Drywall?
According to EPA, 50-100 common indoor mold species can pose health risks. Black mold on drywall can be cleaned using mold removal techniques, drywall cleaning solutions, and moisture control methods to prevent recurrence and further contamination.
Does Drywall With Mold Need to Be Replaced?
Drywall with mold often requires replacement to guarantee effective mold removal and prevent health risks. In some cases, drywall restoration is possible with proper cleaning and moisture control. A thorough home inspection is recommended to determine the best course of action.
Can Mold Behind Drywall Affect You?
Can the wolf in sheep's clothing behind the drywall cause harm? Yes, mold exposure can release an array of health effects, from allergic reactions to respiratory issues, emphasizing the need for mold removal safety, drywall moisture control, and vigilant indoor air quality monitoring.
What Is the Best Spray for Black Mold on Drywall?
Effective mold removal products include DIY mold spray solutions like bleach and water, and eco-friendly alternatives such as vinegar and hydrogen peroxide, while commercial mold removers like Concrobium offer mold prevention tips and a safer option.