Wall crack repair begins with identifying the crack type and proper surface preparation. A Stanley knife expands the crack, followed by thorough cleaning to remove debris. Application of flexible filler using a caulking gun guarantees deep penetration into the void. After curing, the area requires sanding with 100-grit followed by 220-grit sandpaper. Paint matching and texture replication complete the repair. Professional techniques and quality materials determine the durability and seamless appearance of the fix.
Key Takeaways
- Clean the crack area thoroughly with a vacuum and damp cloth to remove debris and ensure proper filler adhesion.
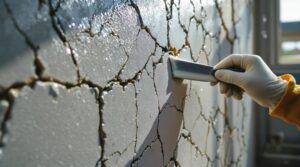
- Use a Stanley knife to widen hairline cracks slightly, creating better space for filler penetration and long-lasting repairs.
- Apply flexible wall filler using a caulking gun, ensuring complete coverage while following manufacturer's instructions for drying time.
- Sand the filled area with 100-grit sandpaper first, then finish with 220-grit for a smooth surface matching the wall.
- Match paint color with existing wall, apply primer, and use appropriate techniques to blend repairs with surrounding texture.
Common Types of Wall Cracks and Their Causes
When homeowners inspect their walls, they commonly encounter several distinct types of cracks that can indicate various underlying issues.
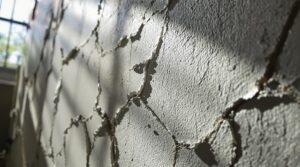
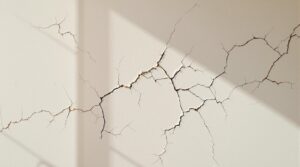
Vertical cracks are usually the result of normal house settling and are generally considered minor cracks that don't pose significant structural concerns. However, horizontal cracks warrant immediate attention, as they may signal serious foundation issues or excessive lateral pressure on wall structures.
Temperature fluctuations and natural material movement often lead to hairline cracks in plaster surfaces. These superficial imperfections typically don't require extensive repair.
More concerning are diagonal cracks, which develop from combined vertical and horizontal forces during settlement, necessitating professional evaluation.
Window and door frame cracks deserve particular scrutiny, as they could indicate improper installation or foundation movement.
Understanding these crack patterns helps determine whether immediate professional intervention is necessary or if the issue represents normal structural aging.
Essential Tools and Materials for Crack Repair

A thorough wall crack repair begins with assembling essential tools including a Stanley knife, filling knife, and caulking gun for precise material application.
Specialized repair equipment encompasses flexible fillers like Toupret, medium and fine-grade sandpaper for surface preparation, and professional-grade putty knives for material distribution.
Safety equipment requirements include protective goggles, dust masks, and work gloves to guard against debris and chemical exposure during the repair process.
Basic Tool Kit Essentials
Successful wall crack repair begins with assembling the right set of essential tools and materials. A Stanley knife serves as the primary tool for widening hairline cracks, preparing them for proper filler application.
The putty knife is instrumental in applying spackling compounds evenly across damaged areas. A filling knife guarantees smooth application of Toupret Flexible Filler, which is specifically designed to accommodate wall movement and prevent crack recurrence. This specialized filler proves particularly effective for long-term repairs.
To achieve a professional finish, two grades of sandpaper are required: 100-grit for initial smoothing and 220-grit to lightly sand the final surface. These progressive sanding stages help create a seamless changeover between the filled area and surrounding wall surface.
Specialized Repair Equipment
Professional wall crack repair demands specialized equipment beyond basic DIY tools. To make effective repairs, specific instruments and materials are essential for achieving professional-grade results. A thorough toolkit should include a caulking gun for precise filler application, along with both coarse and fine-grit sandpaper for surface preparation and finishing.
Key specialized equipment includes:
- Stanley knife and filling knife combination for crack preparation and smooth application
- Toupret Flexible Filler, specifically engineered to accommodate plaster movement
- Professional-grade protective equipment including vinyl gloves and microfibre cloths
Before beginning repairs, clean the area thoroughly with a damp microfibre cloth to guarantee ideal filler adhesion.
This specialized equipment, when used correctly, enables precise crack repair while maintaining structural integrity and aesthetic appeal.
Safety Gear Requirements
Safety consciousness forms the foundation of any wall crack repair project, requiring specific protective equipment to safeguard against common hazards. Professional repair work demands thorough protection through essential safety gear that shields against various workplace risks.
| Safety Item | Purpose | Risk Prevention |
|---|---|---|
| Vinyl Gloves | Hand Protection | Chemical Exposure |
| Safety Goggles | Eye Protection | Flying Debris |
| Dust Mask | Respiratory Protection | Particle Inhalation |
| First Aid Kit | Emergency Response | Injury Treatment |
The proper implementation of safety measures includes wearing safety goggles to protect against airborne particles during cutting and sanding operations. A dust mask provides essential respiratory protection when working with repair materials that generate fine particles. Working at heights requires stable ladder placement to prevent falls, while vinyl gloves protect hands from direct contact with repair compounds and irritants.
Preparing the Wall Surface Before Repair

Proper preparation of the wall surface forms the foundation for a lasting crack repair. Initial steps involve thorough cleaning of the affected area using a vacuum or brush to remove any loose debris and particles that could compromise adhesion. A damp cloth should then be used to eliminate residual dust, guaranteeing ideal bonding conditions for the repair materials.
For effective treatment of hairline cracks, expanding the damaged area using a Stanley knife creates sufficient space for filler penetration and prevents future reoccurrence.
Surface preparation may require additional steps for larger defects:
- Assessment of crack depth and width to determine appropriate repair method
- Light sanding of raised edges around the damage area to achieve surface uniformity
- Final inspection and cleaning of the prepared cavity to confirm complete removal of loose particles
This methodical approach to surface preparation notably impacts the durability and effectiveness of the subsequent repair work, establishing proper conditions for filler application and adhesion.
Step-by-Step Guide to Filling Wall Cracks

A successful wall crack repair begins with a systematic filling procedure that incorporates specialized materials and precise application techniques. The process starts with thorough cleaning of the affected area, utilizing vacuum equipment or damp cloth to remove all debris that could jeopardize adhesion.
The next critical step involves widening and deepening the crack with a Stanley knife, creating sufficient space for the flexible filler material. Using a caulking gun, Toupret Fill Flex is applied directly into the prepared cavity. A filling knife guarantees even distribution and smooth surface consistency during application.
Once the initial filler has completely cured, the area requires light sanding with medium-grade sandpaper to achieve uniformity. The final phase of the repair involves applying Toupret Fine Surface Filler for an impeccable finish.
After this layer dries, the repaired section can be painted to seamlessly blend with the surrounding wall surface, effectively concealing all evidence of the previous damage.
Advanced Techniques for Deep or Recurring Cracks

When tackling deep or recurring wall cracks, professionals must first conduct a thorough structural assessment to identify the root causes before implementing advanced repair techniques. Understanding factors like structural movement and moisture penetration enables the selection of appropriate repair methods and materials.
For deep cracks requiring extensive treatment, professionals employ these advanced techniques:
- Widening and deepening the crack using a 5-in-1 tool to create ideal surface area for adhesion.
- Applying high-quality filler with flexible properties, such as Toupret Fill Flex, while guaranteeing complete penetration into the cavity.
- Installing fiberglass mesh tape over the initial filler layer for reinforcement in extensive damage areas.
The final phase involves progressive sanding techniques, starting with coarse-grit sandpaper and finishing with 220-grit for seamless surface preparation.
This systematic approach, combined with proper material selection, guarantees long-lasting repairs that accommodate structural movement while maintaining wall integrity.
Finishing and Sanding Methods

Successful wall crack repairs depend heavily on meticulous finishing and sanding techniques to achieve a seamless appearance.
Following the manufacturer's drying time specifications is essential before initiating any sanding procedure, with curing periods varying from several hours to 24 hours based on environmental conditions.
The sanding process requires a methodical approach, beginning with medium-grade 100-grit sandpaper to level the repair area, followed by 220-grit paper for refined finishing.
Proper feathering of the edges guarantees the repaired section blends naturally with the surrounding wall surface, creating an ideal foundation for the final paint job.
Post-sanding surface preparation involves thorough cleaning with a damp cloth to eliminate residual particles.
For superior results, professionals recommend applying an additional thin coat of fine surface filler after initial sanding if minor imperfections persist.
This extra step assures a flawless substrate that will enhance the quality of subsequent primer and paint applications.
Paint Matching and Final Touches

The final phase of wall crack repair involves precise paint matching and application techniques to guarantee visual continuity. For ideal results, obtaining an accurate color match is vital by bringing a sample of the existing wall paint to a professional paint retailer.
Before applying the matching paint, a high-quality primer creates a suitable foundation for paint adhesion and uniform appearance.
Key considerations for successful paint matching and repair include:
- Application of Benjamin Moore Fresh Start® or similar primer to guarantee proper paint bonding
- Use of professional-grade brushes or rollers for even coverage and seamless blending
- Proper drying time between coats to prevent texture inconsistencies
For textured surfaces, replicating the wall texture before paint application is essential for achieving an undetectable repair.
Multiple thin coats typically yield better results than a single thick application, allowing for precise color building and opacity control. This methodical approach guarantees the repaired area seamlessly integrates with the surrounding wall surface.
Frequently Asked Questions
What Is the Best Way to Fill Cracks in Walls?
The ideal approach to filling wall cracks involves systematic wall inspection and crack prevention measures.
The process requires thorough surface preparation, including cleaning and widening the crack for better adhesion.
Application of flexible, high-quality fillers using proper tools guarantees durability.
After curing, the area should be sanded progressively and finished with primer and paint for seamless integration with existing wall surfaces.
What Is the Best Product to Fill Wall Cracks?
For ideal wall repairs, Toupret Flexible Filler stands out among polyfilla options for hairline cracks due to its movement accommodation properties.
Deeper imperfections require spackling or joint compound for structural integrity.
Toupret Fine Surface Filler delivers superior finishing results for seamless surface preparation.
Product selection should align with the substrate material, whether plaster or drywall, to guarantee maximum adhesion and longevity of repairs.
What Filler to Use for Cracks in Walls?
Like spider webs across plaster, wall cracks require specific fillers based on their characteristics.
For hairline cracks, Toupret Flexible Filler provides essential movement accommodation, while deeper cracks benefit from spackling or joint compounds.
Fine surface fillers suit superficial imperfections, offering smooth finishability.
Nail pop repairs demand specialized drywall compounds.
Selection should align with crack type, wall substrate, and application requirements for best results.
How Do You Permanently Fix Cracked Walls?
Permanent wall crack repair requires proper identification of crack types and appropriate repair techniques.
The process involves widening and deepening the crack to create a stable foundation. High-quality flexible fillers should be applied to accommodate structural movement.
A surface filler provides a seamless finish, followed by thorough sanding. Priming and painting complete the repair, ensuring long-term durability and aesthetic consistency with the surrounding wall surface.
Final Thoughts
Studies indicate that 98% of wall cracks are cosmetic rather than structural, yet proper repair remains essential for maintaining property value. By following industry-standard repair protocols and utilizing appropriate materials like elastomeric compounds, homeowners can effectively address common wall fissures. Regular monitoring post-repair, combined with maintaining ideal indoor humidity levels between 30-50%, greatly reduces crack recurrence in residential drywall systems.
For homeowners experiencing wall cracks or related property damage covered under their homeowners insurance policy, insurance industry professionals and legal experts strongly advise consulting a qualified state-licensed public adjuster. Public adjusters work exclusively for policyholders, not insurance companies, serving as dedicated advocates throughout the claims process. These state-licensed professionals thoroughly assess damages, including hidden damages that policyholders may not know are covered by their policies, document losses comprehensively, and negotiate with insurance companies to ensure fair settlements while protecting policyholder rights. By partnering with a public adjuster, homeowners can maximize their claim payouts, expedite the claims process, and reduce the stress of dealing with insurance companies. Policyholders interested in discussing their property damage claims can request a no-obligation free consultation with a Public Claims Adjusters Network (PCAN) member public adjuster through our contact page.